The patient's chart is now signed and closed from the signature section at the bottom of the Encounter Review tab, rather than from the Sign Record tab. The chart should be signed by the doctor once the documentation for the encounter is complete. When closing the chart, the provider may enter a signature, use the signature on file (configured in Settings -> Clinic Settings -> Edit Doctors), or if the signature field is left blank, an electronic signature will be used instead. Once signed and closed, the doctor will need to use the Reopen Chart button in order to allow changes to be made to the Vitals, HPI, Complaint, Exam, or Dx/Plan sections.
Return to TopEntries previously recorded in "Progress Notes", "Patient Notes", "Encounter Notes" etc will all be consolidated into the HPI section. The HPI section has been renamed to "HPI and Notes" The last five encounters of notes will be displayed for the provider to review, with a link to click to "Show Previous Notes". The provider clicks the "Add" link in the top right to add an HPI or a Note.
Adding a provider's note to an encounter uses the same process as adding an HPI. We have also added the ability for the provider to record the date they wish to display on the note. The Date of Service will be used by default.
The Quick Review screen now inclues a "Chart Notes" section that replaces the previous "Patient Notes"
Return to TopTo reduce the number of clicks required to record the Dx/Plan we have made several changes to the Dx/Plan screen. When adding a new Dx/Plan to the chart, a blank entry will be created in the chart. To complete this entry, you can either select a Template from the list of Templates on the right, or select "Super Template" to continue without selecting a specific diagnosis.
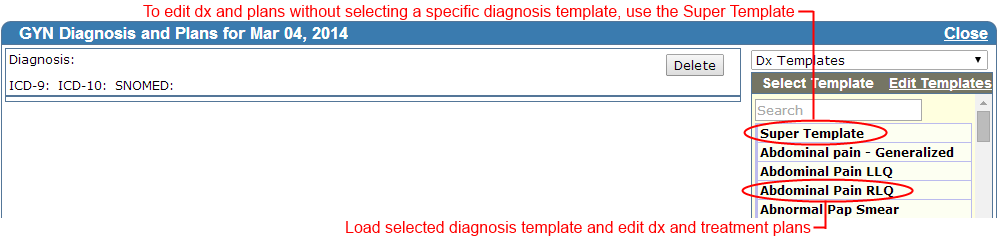
The Dx/Plan edit screen will be displayed. At the top will be an optional Assessment box for a narrative. The Diagnosis name and diagnosis codes will be filled in based on the Template selected. If no template was selected, the diagnosis will need to be entered by hand. If the Diagnosis Code search is used, the selected diagnosis code's name will automatically be filled in the Diagnosis box. The treatment plans are listed in the bottom portion of the box. If using a template, you can switch between the selected Diagnosis Template and your standard Super Template which contains common plans that can be selected in any situation. You can create a treatment plan by selecting from both the Diagnosis Template and the Super Template. Clicking on the "Save Dx/Plan" saves your selected plan. If you would like to add a treatment plan not in the templates, press the button for that plan type.
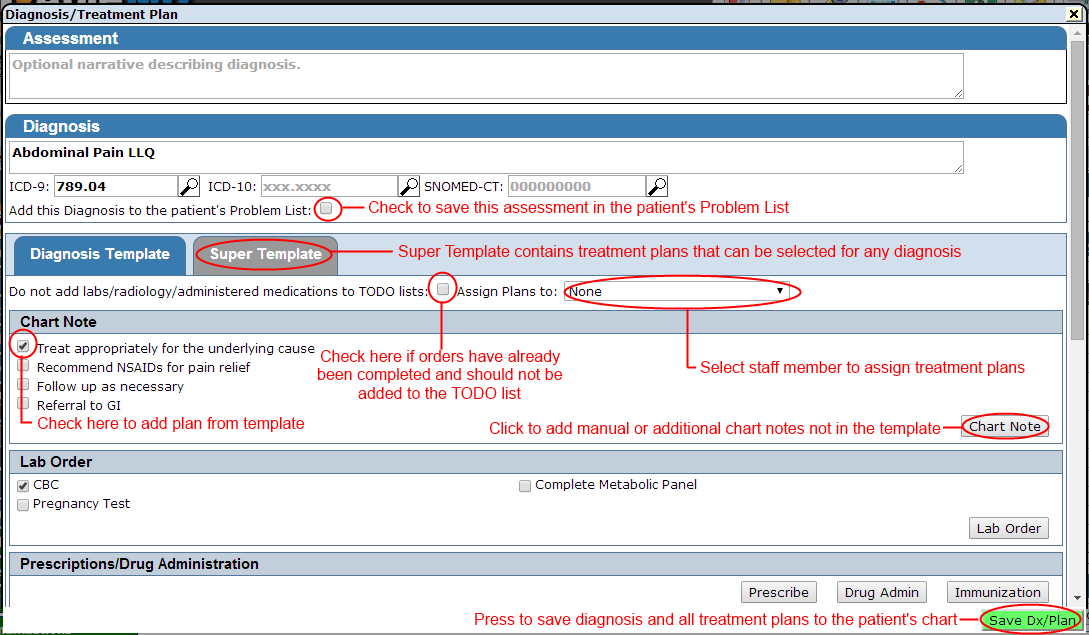
We have restored the ability to assign plans to be done by a specific staff member in the clinic. Before entering or selecting plans, select the user from the "Assign Plans to:" dropdown at the top of the template. Note: you must select the user before manually entering plans.
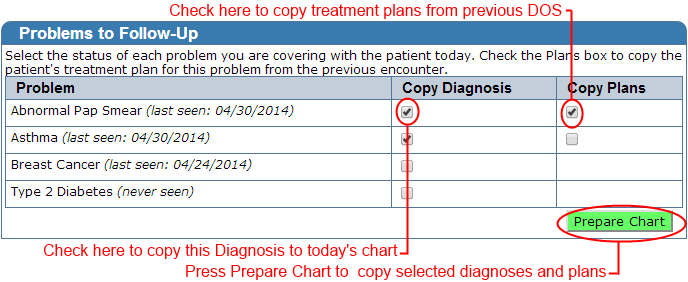
Return to TopFollow-Up will no longer be a separate workflow in the patient's chart. Instead, the Follow-Up tab has been added to the sick visit/GYN workflow. For a patient returning with a previously documented Problem, you can use the Follow-Up tab to select which problems you are following up by selecting the diagnoses under "Copy Diagnosis". When you select a diagnosis to copy, you can also copy certain treatment plans from the previous encounter to today's encounter by checking underneath "Copy Plans". Selected Diagnoses and Plans will be copied to the current chart's Dx/Plan screen where they can be edited if necessary. Multiple problems can be selected at one time, each will be copied to a separate Dx/Plan entry. Press "Prepare Chart" after selecting which problems will be reviewed this encounter to add that information to the current encounter's chart.
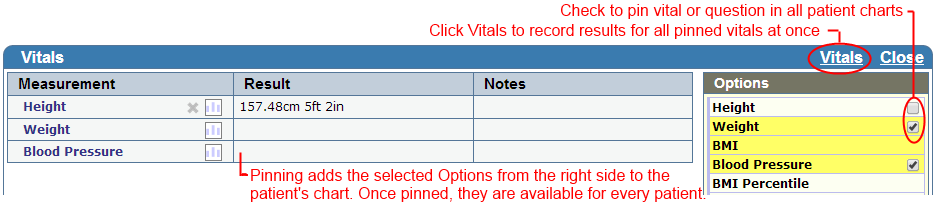
Questions (Medical/Family/Social History, Review of Systems, Exam) and Vitals can now be "pinned" to charts so that they will appear (as blanks) without having to "Add" them to the chart. You can select which questions should be pinned by clicking the "Add" link and placing a checkmark in the checkbox to the right of the question. Once selected, the pinned questions are set clinic-wide and appear in all patients' charts.
Within the patient's chart you can either click on the pinned item or use the "Add" link to record the answer/result in the patient's chart.
If vitals are pinned, then at the top of the vitals section there will be a "Vitals" link. Clicking this link will open a window where all of the pinned vitals can be recorded at one time. Additional results (eg Pulse Ox #2) can still be added to the chart using the "Add" link as before.
Return to TopClicking "Add Complaint" or "Add Comment" now opens a larger box to enter text.
Return to TopThe Family History screen has been revised to show the diseases in the patient's history, with a list of the family members diagnosed with that disease. You can now add to the list of the family members by clicking on the disease on the left, and diseases can be pinned to the list on the left.
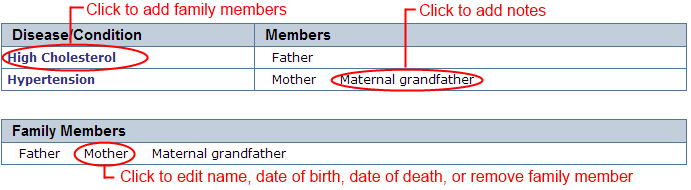
Clicking on the family member in the family history section allows you to edit the date of diagnosis and add any additional comments.
A new section listing family members has been added below the history list. By clicking on a family member here, the member's name, age, date of death, etc. can be updated and the family member (and any recorded diseases) can be completely removed from the patient's chart.
Reminder: You are required to record at least one immediate family member (parent, sibling or child) for Stage 2 Meaningful Use. If the patient's family is healthy, please record at least one of these family members under "No current problems or disability".
Return to TopThe left chart menu is now color coded to separate chart documentation (Blue) from orders (Green) and other documents (Maroon).
Return to TopWhen a provider reviews a new laboratory result, in addition to adding notes and selecting whether the patent should be called or not, we have added a dropdown for "Assign Follow-up To" where a specific staff member can be selected to call the patient or do additional follow-up. Note: Selecting "Do not call patient" will override any assignment of follow-up.
Return to TopWe have moved the ability for a provider to mark a chart as restricted from the System Configuration to the Miscellaneous tab. A provider can use this screen to restrict access to the patient to selected staff members. Please note that this only restricts access to the chart itself, any orders (labs, radiology, prescriptions, etc) may be visible from outside of the chart in the relevant todo lists.
Return to Top